Here it is. I hope it works.
WINTER BLEND and EASTER EGG SNOWFLAKES
Copyright 2008 Laura Blanton
Abbreviations
R ring
Ch chain
- picot
vsp very small picot
SCMR self closing mock ring
Clr close ring
Rw reverse work
Dnrw do not reverse work
Slt shoe lace trick
Lp locking picot
+ join
I used front side/back side tatting in this pattern. I have started tatting almost everything that way. It just looks so much better to me and is no trouble. Using Jane’s method, I have used italics and bold to mark sections where I suggest reversing the order of the ds to achieve this look. This is only needed on round two as the other rounds are all worked on the same side.
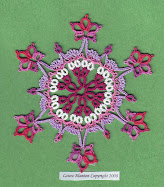
The Easter Egg snowflake is size 20 in five colors. The variegated is Lady Shuttle Maker’s Easter Egg hand dyed thread. The others are Flora.
The Winter Blend Snowflake is size 80 in four colors. I meant to use five but didn’t notice until it was too late that I was working both the rings and chains in round two in one color. The variegated is Yarnplayer’s Winter Blend hand dyed thread and the other is DMC tatting cotton.
FIRST ROUND
Start with locking picot where the "S" is on the diagram in the center
SCMR ch 7 ss R 4 vsp 3 vsp 4 cr ss ch 3 ss R 4 vsp 3 vsp 4 cr ss ch 7 close SCMR ch 2
Repeat 5 times. Join to beginning locking picot. Cut, tie and finish off ends.
SECOND ROUND
R 5+ to 1st picot on 1st ring coming off of SCMR, 5 clr rw
Ch 1 three picots rw
R 5 + to 2nd picot on 1st ring coming off of SCMR, 5 clr rw
Ch 3 – 3 rw
Repeat all of the way around and join to 1st ring. Cut, tie and finish off ends.
THIRD ROUND
Join thread to 1st of 3 picots on round below. This should put you above the ring to the left of “spoke” below. Ch 1, 5 picots lj to 3rd picot below.
Ch 10 slt
R 10 – 5 – 5 clr dnrw
R 5 + to 2nd picot on 1st ring 5 – 5 – 5 clr dnrw
R 10 – 10 clr dnrw
R 5 – 5 – 5 – 5 clr dnrw
R 5 + 5 – 10 clr slt
Ch 10 being very careful to snug up the 1st chain to the slt lj to 1st picot of next 3 picot chain.
Ch 1, 5 picots lj to 3rd picot below.
Ch 5, slt
R 5 – 5 clr dnrw slt
Ch 5, lj to 1st picot of next 3 picot chain
Repeat all of the way around and join to starting chain.
Cut, tie and finish off ends.
Copyright 2008 Laura Blanton
Please feel free to print this pattern for your own use. If you post pictures of your work, and I hope you do, please give me credit for my design and maybe put a link to my page. Enjoy and let me know if you have any problems with the pattern or diagram.


8 years ago


3 comments:
Thank you for taking the time to write out and share the pattern Laura. It is now in by to do file.
Ditto here! Actually meant in my other comment that this is the one I'll probably do in July.
:-) Gina
Thanks Clyde and Gina. It will be interesting to see if I got it right!
Post a Comment