The only difference is #1 was two colors and #2 is one color. No pattern difference except the mock picot.
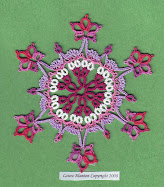
STARFISH #1
You will need two shuttles. If you are using one color, wind continuously.
I used size 20 DMC for the solid yellow and size 20 hand dyed thread for the variegated. It will be about 4” in size 20 thread if tatted tightly.
Abbreviations
R ring
C chain
+ join
LJ lock join
- picot
Clr close ring
Rw reverse work
Dnrw do not reverse work
SS switch shuttles
As with all of my patterns, I used front side/back side tatting for this starfish. In this case, it will be rings in the arms that are tatted from the back side so that the stitches will need to be reversed. I have marked these rings with Italics and Bold type.
When joining between rings on the arms – I just find a little space and put it right in the bottom of the previous ring. You could make a very small picot for this, but there is the chance of it not lining up right.
Rose center:
R (2-) x9, 2 clr dnrw tie threads to make a mock picot (if you are using 2 colors you will have to make a 10th picot instead of a mock picot. Just make the 10th picot and then join the thread back to that last picot being careful not to make an extra space.) I hope this makes sense. Let me know if you need help.
C 3LJ to 1st picot below, 3LJ to next picot. Repeat around to start
C 4LJ around to start. Joins are in space between chains on previous round
C 5LJ around
C 6LJ around
C 7LJ around
C (2-) x3, 2LJ around (there should be a total of 10 spaces around)
Arms:
*C (2-) x9, 2 rw
R 14+14 clr rw LJ to next section of central disc
C (2-) x7, 2 rw
R 10+10 clr rw ( Join to bottom of previous ring)
C (2-) x5, 2 rw
R 8+8 clr rw (join to bottom of previous ring) SS
Shuttle 2 R4-4 clr dnrw SS
Shuttle 1 C (2-) x5, 2+ between rings
C (2-) x7, 2 + between rings
C (2-) x9, 2 LJ to next section of central disc*
Repeat * to * 4 times for 5 arms. Cut, tie and hide ends
© 2008 by Laura Blanton
Please feel free to print this pattern for your own use. I also encourage you to post pictures of your starfish on your blog or website. You may tat these starfish and sell them giving me credit for my pattern. I would like for you to send me a picture of what you tat. Have fun!


8 years ago


8 comments:
Laura, You are going to have to start saving your patterns and publish a book.
Maybe one day, Clyde. I'm still trying to pay my debt to the tatting community! Thanks for the compliment and confidence.
Thank you so much for the pattern. I'm going to make a link to it on my blog so I don't forget where it is. It's so beautiful. I'm with Clyde...waiting for the book ;)
Another winner pattern! See, you will get your book done first...and it will be great!
Thanks Tattingchic and Yarnplayer. This is increasingly exciting! I can't wait to get pictures back of everyone's starfish! hint hint
Laura, your starfish is lovely I am going to print out your pattern and try that. Thank you for sharing it.
Hi Laura, Thank you for sharing your starfish pattern. It will fit in perfect with my sea scene! I'll post a picture when I'm done tatting it. You did a great job with the design.
Bonnie and Carol, I can't wait to see what you do with the starfish pattern. Oh goodie!
Post a Comment