My Pattern Pages Are Here!

My Pattern Pages Are Here!
copyright 2008 Laura Blanton

Wednesday, May 28, 2008

Inga Madsen's Starling - Well Almost


I started out with Inga Madsen's pattern for a Starling. I really didn't change the pattern except to lengthen the tail and add the little extra on top of the head so the wing wouldn't be so out of place. For some reason as I was tatting the wing, the phoenix from Harry Potter came to mind. I know he isn't right yet. I need a picture. However, most of you know how I am about color and I LOVE this little bird!

The thread is all size 20. The orange is Lady Shuttle Maker's, the other variegated is Yarnplayer's and the purple is Flora.

I hope Inga will forgive me for my interpretation.
Posted by Picasa

TIAS through day 5


I've still not a clue what it is, but I think it is so pretty! I need to work with beads more often.
Posted by Picasa

Sunday, May 25, 2008

TIAS through day 4


These last two segments didn't take very long at all. I hope I have it right! (Still no idea)
Posted by Picasa

TIAS day one and two


I finally got enough sense about me last night to get the first two days done. Now I see that I have days three and four to do! I'll try to get them done before the day is over.

I have absolutely no idea what it is, but it is fun to watch it develop!

By the way - all of these beads came from the same packet. I had been trying to be sure I got a mixture of the light and dark and then guess what happened? No? I knew you couldn't figure it out! The end of my size 14 crochet hook that is probably 70 or 80 years old BROKE! They just don't make things like they used to. I found about 5 size 12's and 1 size 13. I ended up with the 13 and the lighter beads won't go on it. So there you go.
Posted by Picasa

Starfish Patriotus Americus pictures #2


Lady Shuttle Maker wanted me to make another picture next to a quarter so that you can all see how delicate this starfish is made with size 80 thread. "And beads too!" said she. Here it is.
Posted by Picasa

Saturday, May 24, 2008

Starfish "Patriotus Americus"


When I introduced my green starfish, I said that I couldn't find out his name and country of origin. Well, I definitely know where this one resides. This one is from the Alabama Gulf Coast. I'm sure he would migrate to other parts of the United States if the natural conditions which he requires were present. You know, like warm gulf waters. I have heard they might be present on the gulf side of Florida as well as in Georgia, Mississippi and Louisiana. I know they are on the Texas coast.

I wonder how many other countries have their own "special" starfish. I think there are probably other American starfish that need to be presented here as well. Maybe some of you have sighted them and have pictures to show us.

I honor of our Memorial Day this weekend, my little friend has been reproduced in size 80 hand dyed thread called "Patriotic" made by Lady Shuttle Maker who is now in Korea. He will be going to live with a dear friend tomorrow. I know she will take better care of him than anyone. She is the most outwardly patriotic person I know and they belong together!

Please let me know if you see any other starfish like this one or in other varieties. In my opinion, the starfish needs greater exposure to the world.
Posted by Picasa

Thursday, May 22, 2008

Introducing Blaze - Isaac's Cat


We are calling this cat "Blaze" as it looks as close as I can get to Isaac's cat. He calls him Blazey, but I'm sure he prefers to be called Blaze. You know how proud cats are!

This pattern is from Inga Madsen's book "Tatted Animals." I've had the book for a while now, but this is the first pattern I have tatted from it. It is strickly a diagram pattern book with the barest minimum of written instructions. I guess I'm getting more comfortable with that as I go along.

I tatted him with the same thread I tatted Jane Eborall's giraffe. The label is long gone, but it is huge! It is two threads twisted together, almost as big as tatting with two size 10's. Blaze is about 6" tall and about 4" across the bottom. The color is a little lighter than it shows up in the scan and his eyes are green glass beads that don't show up. I think I might frame him for Isaac's room.

Now, I have some hand dyed thread of Lady Shuttle Maker's that is chocolate colors that should match one of my cats well enough. We'll find out! I also have to finish a starfish I have started.
Posted by Picasa

Wednesday, May 21, 2008

I'm Still Here

Not much tatting for Lala lately. I've caught Isaac's cold/sinus infection and don't feel like much of anything. I have a couple of things started but no ambition to work on them right now. I haven't even gotten my supplies together for Jane's TIAS. I'm impressed with what I see some of you have done so far. Maybe today or tomorrow I will feel better and get started.

It is so good to see new (to me) people blogging about their tatting. Lost Art? Please!

Wednesday, May 14, 2008

Happy Mother's Day to Me!


What more could a Lala want? Krista just sent me the pictures from Sunday this morning. Isn't he a cutie?
Posted by Picasa

Tuesday, May 13, 2008

Green Sulky Starfish


I finished him/her! I was going to try and be very clever by giving you the scientific name and location of this starfish. Scratch that! It is what it is. There are green ones that I found pictures of, but no names.

Tatting with Sulky size 12 is an interesting job. I really love the results, but there are a few drawbacks. For one thing, it is small. Another, it splits easily and can get fuzzy. If you tat too tightly the rings are sometimes difficult, but not impossible, to close. Still with all of this is has its rewards. This is one of their blendables and the shading is lovely. It gives "living things" a more lifelike appearance, in my opinion.

The pattern for this starfish can be found by scrolling down in my labels to patterns.

Now that the Sulky lesson is over, I'm going to tat one in purple hand dyed thread. I'm not sure which one or what size yet. I think I love starfish!
Posted by Picasa

Monday, May 12, 2008

Today

I'm tatting another starfish, this time in green Sulky size 12. It is slow going. I worked on it a very little bit today, but not much. I'm very sore from my surgery last Thursday and have to be careful. Good news from the doctor - no cancer. I might have to take a pill to prevent future problems. I'll find that out on Thursday. Right now I'm just very happy that I am cancer free!

Sunday, May 11, 2008

Last Night

Well, after the nightmare woke me up and I finally got back to sleep, storms rolled in. We had horrible thunderstorms and tornado warnings off and on for the rest of the night. The emergency sirens woke me up and we watched the t.v. weather until it was safe to go back to bed - we thought. Then we had to get up again. We didn't have to take refuge in the basement this time, but we had to call Bill's mom and have her go to her safe place. It was very close to her house. We had approximately 3 1/2" of rain! We need the rain desperately, but all in all it was a miserable night. I hope I can get a nap today sometime. Now it is supposed to get down to the high 40's tonight and we will have to bring some of the plants back into the transition room. At least the lemon tree will have to come in. I'd hate to lose those lemons.
Here's to a better night tonight - for everyone!

Where's Lala?

Here she is! I've been out of commission for a few days trying to recover from some surgery. I hope I will be mended soon. I did manage to tat Gina's mystery medallion and it is lovely. I encourage all of you to visit her site for the pattern. I would add the link if I weren't too sleepy to figure it out. Anyway, it was fun even for those of us who are very visual. I won't post the picture until she says so.

I'll go and try to sleep again. Not having much luck tonight.

Tuesday, May 06, 2008

Pattern for Starfish #1 and #2

The only difference is #1 was two colors and #2 is one color. No pattern difference except the mock picot.

STARFISH #1

You will need two shuttles. If you are using one color, wind continuously.
I used size 20 DMC for the solid yellow and size 20 hand dyed thread for the variegated. It will be about 4” in size 20 thread if tatted tightly.

Abbreviations
R ring
C chain
+ join
LJ lock join
- picot
Clr close ring
Rw reverse work
Dnrw do not reverse work
SS switch shuttles

As with all of my patterns, I used front side/back side tatting for this starfish. In this case, it will be rings in the arms that are tatted from the back side so that the stitches will need to be reversed. I have marked these rings with Italics and Bold type.

When joining between rings on the arms – I just find a little space and put it right in the bottom of the previous ring. You could make a very small picot for this, but there is the chance of it not lining up right.

Rose center:
R (2-) x9, 2 clr dnrw tie threads to make a mock picot (if you are using 2 colors you will have to make a 10th picot instead of a mock picot. Just make the 10th picot and then join the thread back to that last picot being careful not to make an extra space.) I hope this makes sense. Let me know if you need help.
C 3LJ to 1st picot below, 3LJ to next picot. Repeat around to start
C 4LJ around to start. Joins are in space between chains on previous round
C 5LJ around
C 6LJ around
C 7LJ around
C (2-) x3, 2LJ around (there should be a total of 10 spaces around)

Arms:
*C (2-) x9, 2 rw
R 14+14 clr rw LJ to next section of central disc
C (2-) x7, 2 rw
R 10+10 clr rw ( Join to bottom of previous ring)
C (2-) x5, 2 rw
R 8+8 clr rw (join to bottom of previous ring) SS
Shuttle 2 R4-4 clr dnrw SS
Shuttle 1 C (2-) x5, 2+ between rings
C (2-) x7, 2 + between rings
C (2-) x9, 2 LJ to next section of central disc*
Repeat * to * 4 times for 5 arms. Cut, tie and hide ends

© 2008 by Laura Blanton
Please feel free to print this pattern for your own use. I also encourage you to post pictures of your starfish on your blog or website. You may tat these starfish and sell them giving me credit for my pattern. I would like for you to send me a picture of what you tat. Have fun!

Monday, May 05, 2008

Starfish #2


Here is what I hope is the refined, properly lined up starfish. The pattern is not ready yet, but will be soon. I have a wonderful "helper", (more teacher really), who is guiding me through some mistakes I had in the pattern.

I'm hoping to tat another one tomorrow in a more "starfish" color. This is Lady Shuttle Maker's hand dyed thread "Citrus" in size 20. (I think that's the name. I bought it a long time ago and I'm not sure.) It might look as if it belongs in a Disney movie instead of under the sea, but I like it anyway.
Posted by Picasa

Sunday, May 04, 2008

Our friend's Japanese Blood Maple


I just have to share these pictures with all of you nature lover's. I absolutely love this tree. I think I love it as much as my friend does. Maybe I'll "treenap" it one day! The tree is about 5' tall and 5' across. I guess it's around 5 years old. This is the first time it has bloomed. We didn't even know they did bloom.

At first I said the blooms looked like tiny butterflies, but really they look like tiny paper airplanes. They are at most 1/8" wide!

I hope you enjoy the pictures.
Posted by Picasa

Saturday, May 03, 2008

Labels

I learned something new from Marilee aka Yarnplayer today. In the absence of a web-site for my growing collection of patterns, she taught me how to add a page element for labels. Then I added the label "pattern" to those posts with patterns. I know that some of you have been using this feature for a long time, but it is new to me. Unfortunately, I have such a long list of labels that you have to go way down the list to find patterns. I tried to remove all labels except the very necessary ones, but haven't been successful with that as of yet.

In the meantime I hope you will use the label list to go to patterns. I have to work out a web-site with my internet provider.

Thanks!

Pizzazz Snowflakes #1 and #2


I occurred to me that I should repost the pictures of these two snowflakes closer to the patterns. The diagrams are still further down in the blog. I think they have probably gone into the archives for March.

I have the starfish pattern written up and have asked a friend to test it for me. I am going to re-tat it. I'll put it here when we both finish testing.

One day a website for patterns!

Friday, May 02, 2008

Button Heart #2 in Easter Egg HDT


I tatted Susan's button heart again - properly this time. I used Lady Shuttle Maker's Easter Egg HDT again with another of my grandmother's buttons. This one is a pretty lilac color that is irridescent. The scans of the tatting with buttons haven't been good, so I used the camera for this one. I wish there was some way I could make the bottons show up better. Oh well. You get the general idea.

This is a great pattern that I think would be good for beginner's who want a little more challenge.
Posted by Picasa

Thursday, May 01, 2008

Patterns for Pizzazz

I can't make it work. Basically, every where there is a chain you need to reverse the order of the stitches. On snowflake #2 that applies only to the first round. The second round is all Josephine Chains so it won't apply. Sorry.

I hope you enjoy these.

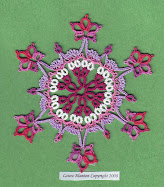
PIZZAZZ SNOWFLAKE #1
Copyright 2008 Laura Blanton

Abbreviations
R ring
Ch chain
- picot
Clr close ring
Rw reverse work
Dnrw do not reverse work
+ join

I used front side/back side tatting in this pattern. I have started tatting almost everything that way. It just looks so much better to me and is no trouble. Using Jane’s method, I have used italics and bold to mark sections where I suggest reversing the order of the ds to achieve this look.

You will need two shuttles, preferably wound CTM

FIRST ROUND

Start with center ring of top three ring cluster.
R2-4-4-2 clr
R2+2-4 clr rw
Ch 4-4 rw
*R4+2-2 clr join it to picot on previous ring
R2+4-4-2 clr
R2+2-4 clr rw
Ch 4-4 *rw
Repeat from * to * 5 times
Ch 4-4 join to center of 1st cluster
SR 4+ to picot on last ring / 2+ to picot on beginning ring 2 clr rw

SECOND ROUND
*Ch 6 rw
*R 5-5-5-5 clr rw
Ch 7 rw
R 5+4 (-)5 times, 4-5 clr rw
Ch 7 rw
R 5-5-5-5 clr rw
Ch 6 + to picot between clusters on round one dnrw continue chain 6 rw *
Repeat from * to * 5 times joining ending chain 6 to picot between clusters below. Dnrw continue chain 6 and join to beginning ring. Cut, tie and finish off ends.

Copyright 2008 Laura Blanton

Please feel free to print this pattern for your own use. If you post pictures of your work, and I hope you do, please give me credit for my design and maybe put a link to my page. Enjoy and let me know if you have any problems with the pattern.

PIZZAZZ SNOWFLAKE #2 IN LAVENDER
Copyright 2008 Laura Blanton

Abbreviations
R ring
Ch chain
- picot
Clr close ring
Rw reverse work
Dnrw do not reverse work
+ join

I used front side/back side tatting in this pattern. I have started tatting almost everything that way. It just looks so much better to me and is no trouble. Using Jane’s method, I have used italics and bold to mark sections where I suggest reversing the order of the ds to achieve this look.

This pattern requires knowledge of Josephine Chains and Rings.

You will need two shuttles, preferably wound CTM. If two colors, as in this example, one color on each shuttle and tie together.

FIRST ROUND

Same as first round of Pizzazz Snowflake #1

SECOND ROUND

*Josephine Chain of 25 half ds. (I used the second half) SS
Josephine Ring of 15 half ds. (I used the second half) SS
Josephine Chain of 25 half ds Join to space between two three ring clusters below.*
Repeat from * to * 5 times.
Cut, tie and finish off ends.

Copyright 2008 Laura Blanton

Please feel free to print this pattern for your own use. If you post pictures of your work, and I hope you do, please give me credit for my design and maybe put a link to my page. Enjoy and let me know if you have any problems with the pattern.

Patterns for Pizzazz Snowflakes 1 and 2

At long last here are the patterns to go with the pictures and diagrams. I have had a lot on my plate lately. For those of you who want to tat them, please let me know if you have any problems. Also, please post pictures if you tat them. I would love to see how they come out.

I'm going to go to the actual files and try posting them from there. The italics and bold disappear when I copy and paste.

The diagrams are further down in the posts where you can print them. One day I will have a website ready for my patterns - I hope.

Monday, April 28, 2008

Three Snowflakes From Jon's New Book!


Here are three of the snowflakes from Jon Yousoff's new book "Snowflake Collection" that I tested for her. The purple one is "Spring Blossom" in size 20. The blue one is "Floret" in size 20. The variegated teal/blue one is "Circle of Crowns" in size 50 hand dyed thread.

It was a thrill to test these for Jon. They are well written and diagrammed. I am proud to finally show them to you. They will make lovely additions to my Rainbow Christmas Tree this year.

I hope you will all have as much fun with the book as I have had with these patterns. Well done Jon!

Look at Jon's blog for her new book!

A quick note and more later. Jon Yousoff has announced her first book of snowflakes! I happen to know first hand that the designs are spectacular! She let me test several of them for her. I will get them posted here, hopefully today. I have to leave in a few for a test this morning or I would do it now.
She has worked and labored over this book for some time now and the results are wonderful. I hope you will all check it out and know that you have to have it!!! I have my order in for an autographed copy. Can't wait! You can find it here Jon's blog and the name is "Snowflake Collection."

Button Heart in Easter Egg HDT


I have tatted Susan Taliaferro's button heart again using Lady Shuttle Maker's Easter Egg HDT in size 20. The button is a pretty pink antique one from my grandmother's collection. Sorry it doesn't show up so well in the scan.

This is proof there is no such thing as a mistake, just design variations! At the bottom center chain on the first round, I was supposed to tat 5-5-5. Instead I tatted 5-5 leaving me one picot short of joining two rings on the 2nd row. So... I had to design a new point. I don't know why it decided to come out with frilly picots. I guess I was thinking how pretty it would be in a baby girl's room and it just morphed into frilly! This one may go into my Etsy shop, which is almost empty now if I can decide how much it is worth.

Oh, the pattern can be found on the Tatting Pattern Calendar on February 20th. Thanks again Susan.

Thursday, April 24, 2008

Where's Isaac - "Here He Is"


Posted by Picasa


Can you believe this is my little baby? Where does the time go? This is a new chair and his first time in it. We had such fun. I say "Where's Isaac?" and he says "Here he is!"

Here he is indeed. Smack dab in the middle of Lala's heart!

Sunday, April 20, 2008

Golden Yellow Daisy


Several of you have tatted this daisy and I just had to try it. Like Elizabeth, I found it tedious because of so many chains, but the end product was worth it. I didn't use beads like Elizabeth, but I think I will tat it again using only six petals and beads to see how it will look as a snowflake. Maybe...

I think Shay is the one who originally posted the pattern which can be found here.

I used size 20 DMC Cebelia in a pretty golden yellow, but this scan makes it look more golden than yellow!

Wednesday, April 16, 2008

Button Heart #2 in Pizzazz


This is the second heart I have tatted using Judith Connor's pattern (copyright 2008) and I love it! The hand dyed thread is Marilee's Pizzazz in size 50. I must say I am getting spoiled to the smaller threads. My eyes don't like it, but as long as you don't make a mistake, there isn't really a problem.

I think these are the three buttons, (10mm), my friend Madeline gave me. Each one is different which, I think, suits this thread and pattern to a tea.

Happy Tatting!
Posted by Picasa

Tuesday, April 15, 2008

A Taste of Spring


Here are a couple of pictures from my front yard. My Japanese Maple is magnificent this year and the dogwoods have been also. The picture of the pink and white dogwood blooms is ONE TREE! I think I remember Daddy saying that the pinks are not as hardy so they grafted a pink onto a white to make it stronger. I don't think this is what they were going for, but I love it anyway.

I hope Spring will soon make it's way to all of you!

Candace's Wedding Hanky Framed - Finally


Well, I have done no tatting since last Thursday. I know. That's almost an unpardonable sin! My allergies are about to put me under. Cough, sneeze, blow, repeat.... I'm going to try to tat some tonight. I did manage to get this hanky framed. It's been in the box waiting on me since September 9th! That's hard to believe.

I don't now if you can tell but it is really a neat frame. The trim is a chrome finish. The hanky is suspended between two pieces of glass with like a built in black matt around it. I'm pretty sure she will hang it on the wall. That means she can take the support off of the back that's for sitting it on a table. Then it won't be showing through.

I will send it to her tonight by her sister. I hope she likes it.

Wednesday, April 09, 2008

Starfish

Okay, you all win. It's a starfish! I wish I had seen that Sherry. Duh! I will write out how I did it as soon as I can for anyone who wants it. I guess I will do another one since they are so fast and see how much more like a starfish I can make it. The thread is Marilee's Rose and is perfect for this.
Thanks for the ideas. I'll be working on an anemone too.


If this looks a "tad" out of balance, that's because it is! I didn't notice until I had two of the arms done that I was going to be one section short for a snowflake. I put it away for a long time, but just couldn't stand to let this beautiful HDT go to waste. Besides, I love the way the arms came out. So, yesterday I just decided to do the best I could. When I got to the end, I joined the last to first and gathered it up. It doesn't look to bad.

I'm pretty sure the thread is Yarnplayer's. It is some of the first I purchased. It is size 20. The rose part is from Denise Munoz's book and I made up the rest.

For you new tatters, this is an example of getting too familiar with a pattern and not paying attention to what you are doing. It also shows that almost anything can be salvaged with enough determination.

By the way, I did all of this with onely one shuttle and a ball thread. And the outside is only one pass.

Tuesday, April 08, 2008

Three Button Heart


This pattern was designed by Judith Connors copyright 2008. I think she did a great job! I don't know if it will be one of my heart exchanges as I don't know what the other three people want yet. Guess I will be forced to keep it if no one wants it!

The buttons are 15mm and the thread is size 20 Flora. It is 3". It is a diagram only with few written instructions, but I had no trouble.

I think I might have to tat it again with HDT when I finish working on my TIAS - or the possibility of one!

Sunday, April 06, 2008

New Idea

I have an idea brewing - just brewing. If it works out it might make a good TIAS. I just now thought of that. No promises. I haven't even sketched it out or started tatting yet.

Stand by!

HELP!

As many of you know, we have been working off of two computers for a while. We just hadn't had the time to finish moving things over to the new one so we could shut down the old one. Guess what? We waited too long. The old one crashed yesterday. I have NONE of my email contacts on this computer. Would those of you who normally communicate with me by email, please send me a message so that I can add you to this address book? We are taking the old one in to someone to see if they can retrieve the informaton on the hard drive. Keep your fingers crossed!

Friday, April 04, 2008

Presenting - The Double Shuttle by Lady Shuttle Maker!


I just received this in the mail today and what a beauty it is! I just can't believe it is mine. The pictures don't in any way do it justice, but it's the best I can do with this old camera. The color is really much deeper. I can't wait to load it up with thread and get started. I have one UFO, then off I go!

Tatting with this should be an adventure and I'm sure as enjoyable as tatting with her other shuttles.

Thursday, April 03, 2008

Ferris Wheel Snowflake


It is, of course, the same pattern as the Winter Blend and Easter Egg. I just think I am going to have to start naming them in a better way. This one reminds me of the ferris wheel at the fair. Mother and Daddy always took us to the State Fair every year. We didn't have much money for entertainment, or anything else really, but they always saw that we got to go to the fair. My dad loved the animal exhibits very much. I guess it took him back to his childhood home in Mississippi.

Anyway, I did make a change on this one. Jon suggested that I join the 2nd and 4th rings to the 3rd ring. I do like it better. She also suggested a change in the 1st and 5th rings. I did it, but I didn't check the counts she suggested. It still looks good but would look better with 8-3-5 instead of 5-3-5. Thanks to Jon for her help.

The variegated thread on the outer rings is Fuchsia by Sherry in size 20. The other four colors are Flora size 20.

Tatting this snowflake is fun, I think, and very quick once you get into it. It is one of those automatic pilot patterns.

I hope you all enjoy it.